Feb 26, 2011

4 comments

How to Get Google Adsense Account Approval

Today most of the bloggers  primary income source is  adsense.Before we start how to creating a adsense account .  lets see the concept of  adsense .

Adsense works as a intermediate  or simply like a broker between the publisher (you) and the advertiser  . Adsense gets the targetted ads to your site automatically based on your content in your site .And pays you  based on the no of clicks  you get to the  advertiser site from your site . This form of advertisement is technically known as  cpc – cost per click .

First lets see how to make a site and apply for adsense

Creating  A  Site Or Blog  For  Adsense
To create a site for adsense needed following steps to do
  1. Buy An Domain
  2. Take An Hosting Account .Blue host is probably the best and i am using it from 4 yrs with out any complaint .If you are planning to take the blue host account dont register it directly just comment here  and i will give you hosting account in blue host for 4$ you can mail me using the contact form
  3. Select content of your site(Domain must be relevant tf the site content )
  4. Applying For Adsense

To Apply For New Adsense Account Follow The Steps  :
1.  Go to, http://www.adsense.com then click Sign Up Now
2. Type your account informations :
Provide your Website information
  • Website url : your web address (domain name  .com  )or blog URL
  • Website language : choose the primary language used in your blog
Your Contact information
  • Account type : choose individual  or business -
  • There is no difference in the services or payment structure between Individual and Business accounts. Business account payments will be made payable to the Company Name, while Individual accounts are paid out to the Payee Name of the account holder select your account type based on the requirements
  • Country or territory : select your country
  • Payee name : typing your complete name here or your  name .Your bank account name must match the payee name or you cant process the checks
  • Street address : Typing your address here. This address is used for delivery of cheque.
  • City/town :  your town
  • State : Provide the state name
  • Postal code
  • Phone

NOTE: please  see the requirements before you apply to the adsense account

Creating  a blog for adsense is simple and its free
  1. Go To Blogger.com
  2. Register a blog
  3. Select the content of your blog
  4. Applying for Adsense is as  above
After creating a Site or blog  you need check weather your site satisfies the minimum  requirements  to apply for adsense.
  • What Are Those Requirements?
  1. Your web site must be your top level  domain
  2. Domain must have been registered and active for at least  6 months before applying for adsense
  3. you must have original  content (must not copied from other sites)
  4. The  registration  information that you provide during adsense registration  must match your domain name registration
See these requirements is applied to your site . and apply for the Adsense  application. if your adsense is accepted you will get an message like this .if  it rejected  that you get meassage llike be sure the below rules and resend the application.
If adsense is accepted your site you will get an code in  your adsene account .copy and paste the code provided  html of your page. The  ads on your page shows the relavent of your site content . you can also display ads verticaly or horizontal.Your  daily earnings will look like this. After  one month of your earnings in send in the form of check like this . They will send according to information that you provided during  adsense application.


If your site is not accepted by the adsense .It means you proparly not devolped. there  many other reasons:
  • Is your site an  “About Me” page
Gennerally google does not accept the presonal blogs because they do not have specified content
  • How “ pages” do you have
See that you  must have  atleast  12 pages on your site .
  • You copied  the” content” of your site from other sites
Google easly can be find out that your content of your site is copied from orther sites or not. so you should not copied from orthers
  • Under “construction” sites will not accepted
Google does not accepted the  Under construction sites . make sure that do not keep pages like this
  • “Adults” content can not be accepted
Google does not accepted the  Adult content sites.not only adult content sites the following sites will not be accepted
  1. Hacking/cracking sites
  2. Illicit drugs and drug paraphernalia
  3. Gambling or casino-related content
  4. Excessive advertising
If the following site’s is accepted in rare cases  it will rejected in future of his eanings.

HTML Quick Reference Tags Guide

Function Start Tag Attributes End Tag
HTML File <html> none </html>
File Header <head> none </head>
File Title <title> none </title>
Comments <!-- Your comments go between the start and end tags. Put a space between the -- and your comments. -->
Body <body> background="filename"
bgcolor="color value"
text="color value"
link="color value"
vlink="color value"
</body>
Division <div> align="right/left/center"
style="property:value;"
class="classname"
</div>
Span (inline) <span> style="property:value;"
class="classname"
</span>

Basic Text Tags
Function Start Tag Attributes End Tag
Line Break <br> clear="left/right/all" </br> or <br />
Paragraph <p> align="center/right" </p>
Bold <b> none </b>
Italic <i> none </i>
Typewriter Text <tt> none </tt>
Headline <h1-6> align="center/right" </h1-6>
Font <font> face="name, name"
size="+/-value/fixed size"
color="color value"
Note: the font tag is being phased out in favor of CSS styles.
</font>
Horizontal Rule <hr> size="XX"
width="XX/XX%"
noshade
</hr> or <hr />
Block Quote <blockquote> none </blockquote>
Division <div> align="left/center/right" </div>


List Tags
Function Start Tag Attributes End Tag
Unordered List <ul> type="disc/circle/square" </ul>
Ordered List <ol> type="I/A/1/a/i"
start="value to start counting at"
</ol>
List Item <li> type=all ul and ol options </li>
Definiton List <dl> none </dl>
Definition List Item <dt> none </dt>
Definition List Definition <dd> none </dd>


Link Tags
Function Start Tag Attributes End Tag
Anchor Link <a> href="filename"
target="windowname"
</a>
Anchor Mark <a> name="markname" </a>


Image Tags
Function Start Tag Attributes End Tag
Insert Image <img> src="filename"
align="left/right"
width="XXX"
height="XXX"
alt="text that desribes image"
ISMAP
USEMAP="#mapname"
</img>


Client-side Imagemap Tags
Function Start Tag Attributes End Tag
Define Map <map> name="mapname" </map>
Area Definition <area> shape="rect/circle/poly/point"
coords="X,Y,X,Y"
href="imagename"
</area>


Table Tags
Function Start Tag Attributes End Tag
Table <table> border="X"
width="XX/X%"
cellspacing="XX"
cellpadding="XX"
bgcolor="color value" background="filename"
</table>
Table Row <tr> align="left/center/right"
valign="top/middle/bottom"
bgcolor="color value"
</tr>
Table Data <td> align="left/center/right"
valign="top/middle/bottom"
width=X
nowrap
colspan="X"
rowspan="X"
bgcolor="color value"
</td>
Table Header <th> align="left/center/right"
valign="top/middle/bottom"
width=X
nowrap
colspan="X"
rowspan="X"
bgcolor="color value"
</th>
Caption <caption> align="left/center/right"
valign="top/middle/bottom"
</caption>


Frame Tags
Function Start Tag Attributes End Tag
Set Frames <frameset> cols="XX/XX%/*"
rows="XX/XX%/*"
</frameset>
Frame Definition <frame> src="filename"
name="framename"
noresize
scroll=auto/yes/no
marginwidth="XX"
marginheight="XX"
</frame>
Base <base> target="framename"/
"_self"/
"_top"/
"_parent"
(Note the underscores)
</base>
No Frames <noframes> Between start and end tags, place the content that appears when a non-frames browser loads this page. </noframes>


Form Tags
Function Start Tag Attributes End Tag
Form <form> method=get/put
action="programname"
</form>
Input Field <input> name="variablename"
type=text/password/
checkbox/radio/submit/
reset/image
</input>
Selection List <select> name="variablename"
size=XX
multiple
</select>
Selection Option <option> none </option>
Scrolling Text Field <textarea> name="variablename"
rows=XX
cols=XX
</textarea>


Meta Tags
Function Start Tag Attributes End Tag
<meta>
(Server metatags)
http-equiv="refresh"
content="seconds, filename"
none </meta>
<meta>
(Content metatags)
name="keywords/description/author/
generator/abstract/expiration"
content="your information"
none </meta>


Style Sheet Tags
Function Start Tag Attributes End Tag
Style Definition Area <style> type="text/css">
Style declarations go between begin and end style tags
</style>
Link to external CSS File <link> rel=stylesheet
type="text/css"
href="URL"
none


Commonly-Used Special Characters
Name Symbol HTML Equivalent
ampersand & &amp;
cent sign ¢     &cent;
copyright symbol © &copy; or &#169;
degree sign ° &deg;
greater than > &gt;
less than < &lt;
non-breaking space &nbsp;
registered trademark ® &#174;
trademark
&#153;

Feb 10, 2011

2 comments

DVDVideoSoft FreeStudio : Complete All-In-One Multimedia Converter And Burner

 One installation for 41 programs


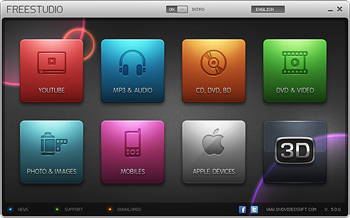
DVDVideoSoft FreeStudio packages more than 40 programs for converting and burning into one eye-candy application.

You can convert YouTube video into MP3, Audio CD to MP3, WAV, APE, and FLAC format, Video to Mp3, Flash, DVD, MKV, AVI, and MP4 format. Despite having a slew of conversion tools, it lets you burn CD/DVD and Blu-Ray discs on the fly. It offers plentiful of disc authoring tools to burn videos, DVD files, audio tracks, and to create Audio CDs from MP3 files.


Features list doesn’t end here, image manipulation tools have also been included to convert and resize images, convert video files into pack of JPGs while both 3D photo and video maker are also available. It supports all Apple Devices, allowing you to convert audio and video files into supported formats for Apple TV, iPhone, iPod, and iPad. Apart from supporting all the formats, it has an ability to convert audio and video files into famous portable devices, gaming consoles, and other smart phone formats, including, Andriod, Blackberry, HTC phones, Motorola, Nokia, Xbox, Nintendo, and PSP.

Supported OS:
Windows XP/Vista/7

Description

New Free Studio Manager is a completely redesigned all-in-one package for our programs. It contains 8 sections to bundle all free multimedia applications which have been developed by DVDVideoSoft. These sections the following: YouTube, MP3&Audio, CD-DVD-BD, DVD&Video, Photo&Images, Mobiles, Apple Devices, 3D. Thus all the programs are included in the new interface for easy access to any of them.
With this free software you can convert video and audio files between different formats and to iPod, PSP, iPhone, BlackBerry and all popular mobile phones and devices; burn and rip DVDs and audio CDs; upload and download YouTube videos and music to your computer, iPod, PSP, iPhone and BlackBerry; perform basic editing of audio and video files as well as record videos and make snapshots.

Free Studio contains no spyware or adware. It's clearly free and absolutely safe to install and run.
Free YouTube Download
Free YouTube to MP3 Converter
Free YouTube to iPod and PSP Converter
Free YouTube to iPhone Converter
Free YouTube to DVD Converter
Free YouTube Uploader

Free Video to Android Converter
Free Video to Apple TV Converter
Free Video to BlackBerry Converter
Free Video to HTC Phones Converter
Free Video to iPad Converter
Free Video to iPod Converter
Free Video to iPhone Converter
Free Video to LG Phones Converter
Free Video to Motorola Phones Converter
Free Video to Nintendo Converter
Free Video to Nokia Phones Converter
Free Video to Samsung Phones Converter
Free Video to Sony Phones Converter
Free Video to Sony Playstation Converter
Free Video to Sony PSP Converter
Free Video to Xbox Converter

Free DVD Video Converter
Free Video to DVD Converter
Free Video to Flash Converter
Free 3GP Video converter
Free Video to MP3 Converter
Free Video to JPG Converter
Free Audio Converter
Free Audio to Flash Converter

Free DVD Video Burner
Free Disc Burner
Free Audio CD Burner
Free Audio CD to MP3 Converter

Free Screen Video Recorder
Free Image Convert and Resize
Free Video Dub
Free Audio Dub
Free Video Flip and Rotate

Free 3D Photo Maker
Free 3D Video Maker

MySQL Explorer: Import And View MySQL Database From Desktop

MySQL is one of the well-known database management software applications and almost all open source applications use MySQL at the back-end.  

MySQL Explorer lets you view and explore MySQL databases quickly, a small handy application for database administrators, webmasters, and developers.


It is a portable application. Specify the username and password to connect to MySQL, once your connection is established then it will list down all the available databases.

Click the Database name in the first list box and it will populate  the related tables for the selected database.


You can use the navigation buttons to move back and forth through out your tables.

MySQL Explorer Navigation

The Import Database option lets you import another database to your MySQL server. All you need is a schema file for MySQL. This can also be immensely helpful to the webmaster who won’t need to go all the way to PhpMyAdmin only to import the database.

Since the application’s main purpose is to view the database, export and delete functionality is thus not available at the moment. If you want such functionality, just give a shout to the developer and let him know.

Download MySQL Explorer

We tested it successfully on Windows 7, it works with all previous versions of Windows as well.

Import MySQL Database From phpMyAdmin To MS Access

phpMyAdmin is used for storing databases, with simple and dead easy interface, you can handle MySQL databases in a convenient way.
But when it comes to exporting data to novice-user oriented applications, it doesn’t support direct data migration.
If you are looking for way for data migration/transfer from phpMyAdmin to Microsoft Excel or Access, then this post may help.


Open phpMyAdmin, Select database you want to export, and click Export.

clip_image001

You will reach Export window, choose the format in which you want to export the database. We will choose CSV for Excel, enable zipped radio button from save as file options, and hit GO button at the bottom-right of the window to start exporting data.

clip_image002

You will be prompt for choosing output destination for the file. Download the file and unzip it.

clip_image003

Open the exported file in Excel 2010, to check whether data fields are still intact or not.

clip_image004

On File menu, click Save As to save the file in xlsx format.

clip_image005

Now launch Access 2010, head over to External Data and click Excel to import worksheet.

clip_image006

You will see Get External Data dialog box, it shows three different options of how and to where database will be stored. Go through the options (with details) and select one. We need to create a database in which table will be created by Access automatically.

clip_image007

Since the first row not contain the column headings, so we will leave this step, click Next.

clip_image008

In this step you can specify information about each of the fields you are importing. Select field/column in the area below and  specify corresponding Field Options. Click Next to continue.

clip_image009

Here you can define a primary key(unique identifier) for the table, enable Choose my own primary key and select Field1 which seems to contain auto_increment data type.

clip_image010

Give the table an appropriate name and click Finish.

wizard 5

The database table from phpMyAdmin through Excel is successfully inserted into Access.

clip_image012

For adding more fields and applying constraints, switch to Design View.

clip_image013

Note: The above demonstration shows data migration of small database, there is however no guarantee of successful migration if you need to export huge databases.

save

Transfer MS Access Database To MySQL In 4 Simple Steps

     Transferring database from one system to another is always a headache regardless of how big or small the migration scale is.

Therefore, database managers, generally, look out for a simple tool which can perform export and import operations with all the variations involved.

If you’re planning to migrate data from Access to MySql, you’d probably have a lot methods in mind to port databases.

Before implementing any of them, try MS Access to MySQL

It is an ingeniously simple utility to quickly port Access database to user-defined MySql database. 
While it supports a wide range of database formats, including, MDB, MDE, ACCDB, and ACCDE, it shows MySql database hierarchy to choose the destination database path. Furthermore, password protected (encrypted) databases can also be exported on the fly without having to decrypt them.

It allows two transfer modes – Direct transfer and Dump file creation. In direct transfer mode, you need to enter the host address, port, DB username and password along with DB name where data has to be directly ported, optionally, you can choose a local location to create SQL dump file for importing it later.


It has a simple wizard with 3-4 steps for transferring data. In the first step specify source database, second step refers to choosing transfer type. Depending upon the type, it will ask you to choose options in latter steps. In direct transfer mode, enter the all required information for establishing connection, specify DB name, and pick out the storage engine.

ss_destinationdatabase

In the last step of direct transfer, it will ask you to choose some database transfer-related options, such as, Transfer indexes and records, Include column list in INSERT, create tables, and so on. Depending upon the requirements, select the appropriate options and click Run Now to begin the process.

ss_options

Creating Sql Dump file needs nothing except specifying the target location where you want to save the Sql file. After the transfer is completed, it is recommended to thoroughly verify the the database migration including all the included tables with indexes to prevent any conflicts in the future. It works on Windows XP, Windows Vista, and Windows 7.

Download MS Access to MySQL

Credits: usmanaddictivetips.com

Find Out Who Is Stealing Your Articles And Keep Check On Plagiarism


Unique Content verifier, also called UN.CO.VER, is an application for Windows, Mac and Linux based operating systems that verifies the specified content from the internet and displays a result of websites that have copied it.

Just copy and paste the text from an article to see what websites have the matching text.
This can be used by not just authors to check if someone has copied their article but also by teachers who might be interested in verifying student assignments.

UN.CO.VER can be used not just to for general verification over the internet but also with a single URL and an entire website (inclusive of primary and sub-domains).


To get started, either copy & paste the content from an article or manually type it and click Check Now.

This will display the websites that contain matching content. It must be noted however, that if the content match is as negligible as 15-30 percent, then it might be a case of mere coincidence. On the contrary if the content is displayed as 50% or more as copied, then it is easily verifiable if someone as copied content from a certain source. During testing I found it quite interesting that no matter what term I entered, Wikipedia seemed to be the result of the duplicate content. This obviously because it is an enormous resource filled with zillions of text pages and some extent of content (e.g. 2 %) is likely to match any of its articles.

UN.CO.VER - Unique Content Verifier 2.0
Domains can also be checked by entering the Domain name, text (optional)  and clicking on the Check Now button.  Web projects can also be loaded (via the Check Websites tab) and verified for plagiarism. Any link that contains a copy of the same content can be opened by double clicking on it (from the result).

Check Domain

With UN.CO.VER the days of ripping information off other websites (at least for students) can soon be over. It works with Windows XP, Windows Vista and Windows 7.

Download UN.CO.VER (Unique Content Verifier)

source: www.addictivetips.com

Multiple ISO Images Into Single Multiboot USB / ISO File With XBoot

XBoot is a powerful application which is designed on the idea of creating multi-boot ISO/USB from a set of ISO image files.

Until the release of XBoot, there was apparently no easy way to collect multiple ISO files into one package.

The application also comes with number of supported websites where you can download the ISO file which can be used to create bootable USB or a collective ISO image to burn on optical disk.  Since many software application developers roll out their utilities in ISO image format, it can be utterly useful to make an amalgamate of all essential ISO images.

Furthermore, checksum calculator is also deployed within the application to verify the original release of inserted ISO image.


The application offers easy usage catering to both amateurs and pros alike. All you need is to drag & drop the ISO images from local location into it. It will then automatically start calculating the total size while letting user make suitable alternations to inserted ISO image title. From right sidebar, you can calculate the MD5, SHA-1, SHA-256, etc, checksum.

xboot 1

The connected USB flash drives can be selected from Edit MultiBoot USB. Alongside, you can edit Grub4dos bootloader config file and install it.

XBoot 2

After you’ve included all the ISO images, either select Create ISO to put all the ISO images into one or Create USB to write ISO on specified USB drive. For power users, it offers portable processor emulator- QEMU that lets you easily Boot USB on QEMU from respective tab. Just drag and drop ISO over pre-defined area, select the drive and click Boot.

qemu1

With XBoot up and running, you wont need to search for applications packed into ISO files over the web, it offers a list of famous websites which can be directly accessed. As of now, some Windows and Linux based developers’ websites are listed along with some anti-viruses suites. According to developer, the list will be furnished upon users requests.

download sites

The application worked flawlessly on Windows 7 x64 system. It supports Windows XP/Vista/7, and requires Net Framework 4.0.

Download XBoot

Create Multiboot Windows And Linux USB Drive With WinSetupFromUSB

There are many tools available out there which allows user to create bootable USB drives, but what if you need to create a multiboot USB drive which can keep more than one bootable installation packages, lets say,  Windows XP, Windows Vista, Ubuntu and Windows 7?

WinSetupFromUSB can create a multiboot setup, allowing user to keep a range of bootable ISO files on single drive.
The application comes with support for OS including,  Windows 2000, Windows XP, Windows 2003 Server, Windows Vista, Windows 7, Windows Server 2008, Parted Magic, and Ubuntu,G4D.
Just specify the OS installation directory to create multiboot USB drive with a single click.


Usage is simple and self-explanatory. It’s recommended to insert a formatted drive, however, Bootice and RMPrep options are available to format data. Now in Add to USB disk section, hover the mouse pointer over the OS checkbox to read the description of required files for creating ISO images.

After understanding the pre-reqs, select the checkboxes and specify the location of folder where OS setup files are residing. Once it detects correct setup with all required files, Go button at the bottom will become active. Click this button to start the process. It is worth noting here that it takes far more time than creating a single bootable USB drive, so have patience.

wind 3

As of now, QEMU test is in experimental stages, therefore, you need not to go for inspection. Enabling Advanced options checkbox will show settings related with creating bootable USB drive.

advance 2

Since it is in beta testing phase, you might run on some errors while creating a multibootable USB. It works on all versions of Windows.

Download WinSetupFromUSB

How To Increase Your Laptop’s Battery Life

With the rise in laptop sales it is essential for laptop buyers to make sure they use their laptop batteries to the fullest and also make sure they can achieve the highest performance with the available battery.

Generally most laptops claim to have 4-6 hours of battery life but in real it comes to 50% of the promised backup time because of many factors like heavy laptop usage while on battery backup, running USB Based gadgets, CD/DVD ROMs etc.

You also need to make sure about some battery life saving tips because the laptop batteries generally have a life of around 1000 recharge cycles.

Here is a list of some essential tips which can almost double your laptop battery life.


Screen brightness

Almost all laptops come with the ability to dim the screen brightness. Some even come with ways to modify CPU and cooling performance. The display system takes 50% of your available battery and lower brightness would ensure you more battery life.

21192013nu9

Power Cord

Recharge your laptop  using the power cord/adapter provided by the laptop dealer and don’t use any other local cord because they can decrease the life of your battery.
s2

Remove Your Batteries When Not In Use

If you don’t use your laptop for a continuous period its recommended to remove your batteries completely from the laptop and add it back when you plan to use it. This is because laptop batteries have a limited lifetime and its generally 1000 charge cycles after which they stop offering complete backups. Even if it is not in use, the battery still drains, so you should completely remove it and store in a cool place and at a 40% charge rather than 100% charge.

Background Processes

When you are running your laptop on batteries, avoid heavy multitasking, because processor and ram will then need more power thus making your battery drain further.
task.jpg

Wi-Fi

Wi-Fi should be turned off when not in use because it drains your laptop battery in search of signals and wireless router. You can use the hardware switch available on the laptop to disable your wifi or disable it from the Network Connections option available under your Control Panel.
WiFi Icon


Disable Aero Glass

Disable Aero Glass Feature which comes preinstalled in Windows Vista. You need to right click on your Desktop > Preferances > View Colour > Appearance > Classic Appearance and Windows Basic graphical interface > Ok , this way you can get the classic appearance which has less resource using features and helps you use less battery power.

window-color-and-appearance

Heat Control

Your laptop operates more efficiently when it’s cooler.  Clean out your air vents with a cloth or keyboard cleaner.

Optimize Power Options

Go to ‘Power Options’ in your windows Control Panel and set it up so that power usage is optimized (Select the ‘max battery’ for maximum effect).

windows-vista-power-options2

No Multitasking

Do one thing at a time when you’re on battery.  Rather than working on a spreadsheet, letting your email client run in the background and listening to your latest set of MP3’s, set your mind to one thing only. It is important to note that it is fine running an idle program at the background but if the program is constantly doing some work like downloading or extracting a Zip  file, this is when the battery drains out.

External Drives

USB devices (including your mouse)  drain down your laptop battery.  Remove or shut them down when not in use.  It goes without saying that charging other devices (like your iPod) with your laptop when on battery, is a like putting a wood on fire.
usb

Battery Recharge

Do not leave a charged battery dormant for long periods of time.  Once charged, you should at least use the battery once every two to three weeks(2 weeks is recommended). Also, do not let a Li-On battery completely discharge.

Hibernate Not Standby

Although placing a laptop in standby mode saves some power and you can instantly resume where you left off, it doesn’t save anywhere as much power as the hibernate function does. 
Hibernating a PC will actually save your PC’s state as it is, and completely shut itself down. Settings up Automatic Hibernate feature to make sure the laptop automatically saves all your running documents and applications, and hibernates when you are not using the laptop for a given amount of time is very important.

 enable_hibernate

Clean Battery

Clean your battery’s metal contacts every couple of months with a cloth moistened with rubbing alcohol.  This keeps the transfer of power from your battery more efficient.

Install Vista Battery Saver

Vista Battery Saver is a very useful app that I’ve been using for the last couple of days to improve the battery life of my laptop running Windows Vista. I wouldn’t say that it has improved my battery life by the claimed 70%, but it has delivered significantly better battery performance. It also automatically switches back to a different power plan as soon as you plug your laptop back in, so that you can access all those fancy Vista features again.

software

I hope you will be able to save your battery life using these steps, if we have missed anything important, do let us know with your comments.

Create A Quick Ad Hoc Wireless Network Connection Between Two Computers In Windows 7/Vista

Do you want to create a quick network connection between two computers or laptops to share some files?

Or maybe you want to share an internet connection?

Windows 7 and Vista have a build-in feature to create a quick ad hoc wireless network connection, this means you can connect directly with another computer or laptop without the need of a router.


To begin, click Start and select Network. Now click on Network And Sharing Center as shown in the screenshot below. If you can’t find Network, then type Network in Start Search and hit Enter.

icon of network connection

Now in the left sidebar, click Set Up A Connection Or Network. From the list select Set Up A Wireless Ad Hoc(Computer-To-Computer) Network option and click Next.

set up wireless ad hoc network connection

Click Next again and it will ask you to type a Network name and select the Security settings as shown in the screenshot below.

network name and security coptions

Make sure you select a good password, if you don’t know which security type to select, click on Help Me Choose link next to it. After you are done click Next and the Network connection will be ready.
Now in the Network And Sharing Center you can choose what to share as you can see from the screenshot below.

sharing and discovery

To Share an Internet Connection, click View Status next to the connection that you want to share. Now click on Properties button which you will find under Activity.

Click on the Sharing tab and tick the checkbox where it says Allow Other Network Computers To Connect Through This Computer’s Internet Connection. Under Home Networking Connection select Wireless network Connection and click OK.

network connection sharing properties

Now your connection is ready to to shared. To enable the wireless network connection you just made, go to Start and click Connect To.

connect to a network

You will see your wireless connection listed there. Select your connection and click Connect.

wireless network connection

You will see a success message as shown below.

Wireless is ready to be used

You will see your connection listed under Wireless Network Connection on the other computer. Simply connect from there and you are done sharing the internet connection.

Note: To connect successfully make sure the wireless hardware is enabled on both computers or laptops.

source: www.addictivetips.com


How To Share Internet Connection With Another Computer Using Windows 7/Vista

Having two computers at your home, you may have only one internet connection which you want to share between two computers.

Now consider there are two computers. Computer A has Windows Vista while computer B has Windows XP. Computer A is connected to internet via cable (so this will be connected through LAN card). Now to connect to Computer B, you will need another LAN card (to connect to more than one computer, you will need a wired hub).

First, Let us connect two computers in LAN

Follow these steps to connect two computers in LAN.

Step 1: In Windows 7/Vista, you should enable Sharing and Discovery before doing that. You can do this by going to Control Panel > Network and Sharing Centre. Under the section Sharing and Discovery, enable Network Discovery, file sharing, public folder sharing and others if you want to. (The screen short below gives you idea). Here first network shows connection to internet and second one the local connection with another computer.


Step 2: If your LAN card that is connecting to another computer is installed, it will be shown at Control Panel > Network Connections.

Step 3: Right click the Local Area Connection and click Properties.

Step 4: Under the tab ‘Networking’, click the properties internet protocol version 4(TCP/IPv4).

Step 5: Click the radio button to ‘use the following IP’ and give an IP address (Forexample: IP address: 192.168.0.1 and Subnet Mask: 255.255.255.0). Do not give any other information, Click OK and close.
 
Step 6: In Computer B, make sure you enable the LAN card which is used to connect to computer A. Here you need not give any IP information as Computer A will assign an IP address dynamically. If it is not working, make sure there are no IP assigned and change the properties to ‘obtain an IP address automatically’.
 
Step 7: Test the connection by pinging (You can do this by typing ping 192.168.0.1 or whichever is Computer ‘A’s IP in the command prompt).

Now let us share the internet connection of Computer A with Computer B

Right click the LAN card which is connected to the internet under Control Panel > Network Connections and click the Sharing tab and click both options to connect internet (Remember: Unless there is another enabled LAN setting you will not be able to see the shared tab under properties). Click OK and close. This option is given by Windows known as ICS (Internet Connection Sharing).

That is it, now you can use internet in both computers A and B.

Connect Two Laptops Using WiFi

This is step by step tutorial on how you can connect two laptops using WiFi (or two desktop computers with WiFi devices). This type of network is known as peer to peer network and is useful for file sharing and using same internet connection on both systems. So as told earlier you should have two laptops with WiFi or desktops with WiFi devices to make this connection.


Connecting Two Computers Using WiFi

Let’s name both laptops as PC1 and PC2. Now we need to set names and workgroups of both computers (Remember both computers will have same workgroups). To set the name and workgroup of both computers right click on My Computer and select Properties. Click the tab which says Computer Name and change names of computers as you like (Here we will set computer names PC1 and PC2) and also change the Workgroup option as you like (but this Workgroup should be same for both computers).


Now you need to make “Wireless Network Connection” in PC1. Right click on Wireless Network icon for this and click on option “View Available Wireless Network”.


Now click on option “Change Advance Settings”.


Now a windows “Wireless Internet Connection Properties” will open. Click on the tab which says “Wireless Network” and then click Add button. Now write a name in Network Name field. You can also set a password here if you like and also remember to check the option “This is computer to computer network”. Now press OK and “wireless network properties” will be closed.


Now in next step, you need to provide IP for network in “Internet Protocol (TCP/IP)”. For this, right click on “Wireless Internet Connection” and go in Properties and click Internet Protocols and then click Properties.

Here For example.

PC1 = IP Address: 192.168.1.1 Subnet Mask: 255.255.255.0
PC2 = IP Address: 192.168.1.2 Subnet Mask: 255.255.255.0

And Default Gateway as 192.168.1.1 (same as IP address of PC1). Having done this all, you can connect both computers using WiFi.


PC2

File Sharing Between Both Computers

Now for file sharing Enable the Sharing of “Shared Folder” in both computers. So to go in other computer, write IP address of that computer in address bar of first computer and press Enter (in this case write \\192.168.1.1 and press Enter). This will open other computer’s sharing folder where you can share file, delete files or rename them (make sure to allow these actions from other computer).

Wireless Internet Sharing Between Both Computers

It is very easy to do when you have followed above procedure. Right click on “Internet Connections” on one computer (which has internet connection in it) and go in Properties and click on Sharing and check the option which says “Allow other network users to connect through this computer” and select “Wireless Internet Connection” in “Home Network Connection”. If you want you can also check “Establish Dialup Connection” and “Allow Other Network” .


That is it. You have connected both computers using WiFi and now you can share files, play games and chat on this network.